Complete Guide to Calibration and Use of TITAN Series Top Camera
Preface
Camera calibration ensures precise design alignment for the machine. This guide walks you through the process to boost accuracy and output quality.
How to import the calibration file
Every machine in the TITAN series has a camera or dual camera, as well as a calibration file. Import the calibration file directly to use the camera.
Specific steps
- To import the camera calibration file, we first need to follow the steps shown in the figure below to find the 'External import' entry.
- Next, find the U disk in the Key bag and connect it to your computer.
- Finally, locate the calibration file in the following path and import it.
How to calibrate the camera
It should be noted that the camera of your machine has been calibrated before leaving the factory, and the calibration file has been saved in the U disk. Unless necessary, please skip this camera calibration process, and do not adjust the camera on the machine to avoid deviation in accuracy that requires re-calibration.
Specific steps
- Connect the machine.

TITAN Connection Method
- Please place the plywood on the platform and ensure it is flat and secure (you can use clamps, double-sided tape, or other suitable methods based on your actual equipment). Then, move the laser head to the machine zero. You can refer to this picture for the positions of the plywood and the laser head.
- After moving the laser head to the position of the picture above, please click the Origin button on the touch panel.
- Use the auto focus function on the touch panel to focus.
- Take off the camera cover.
- Adjust the sharpness of the camera.
Put a piece of printed paper on the plywood for adjustment. Before opening the built-in camera function on the computer side, please connect the camera cable directly to your computer first.
You can open the right side door of the machine to find the camera cable.
Left camera | Right camera |
- Rotate the gear counterclockwise to loosen it a bit.
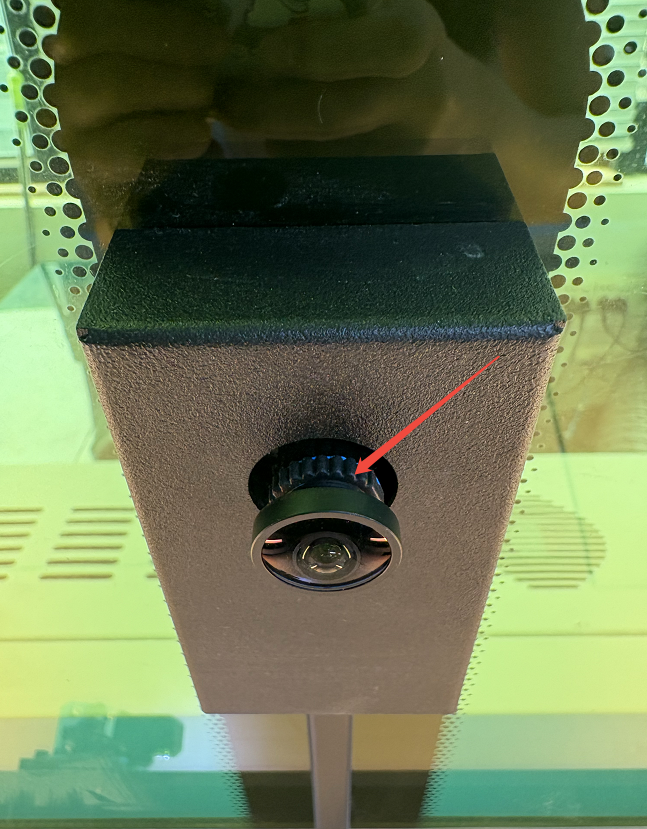
- Close the top cover and adjust the sharpness of the camera by rotating it.
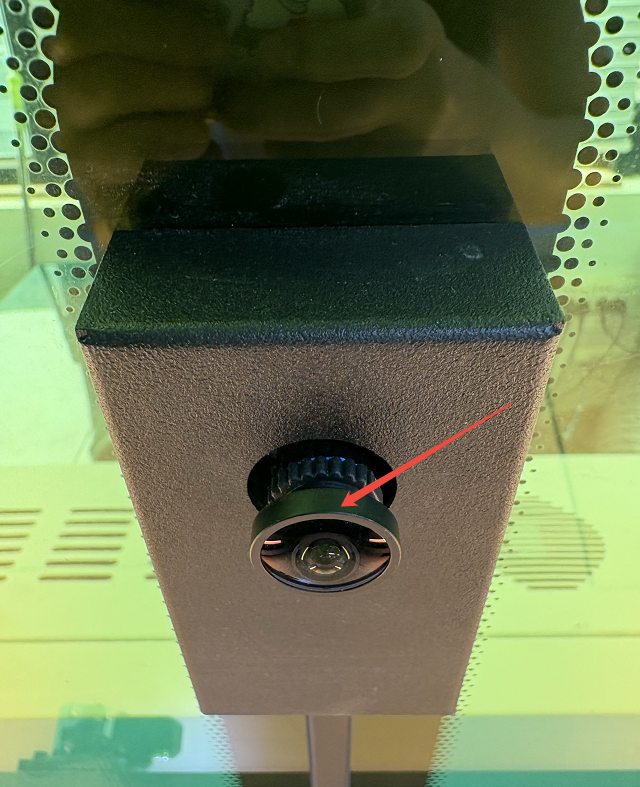
In order to ensure that the camera's sharpness is adjusted to the best, it is recommended to use such an adjustment method.
First, open the front door panel, then close the lip cover to create enough space for your hand to reach in and make adjustments.
- Adjust until the picture is clear, and you can also see the words on the paper clearly. Turn the gear clockwise to fix the camera.
- Before performing this step, make sure that your machine is successfully connected to your computer.
- Next, go to Settings >> Camera >> Camera-Top.
- Then, click the 'Fisheye Lens Calibration Board' option to download the fisheye lens calibration template for subsequent camera calibration.
- After that, click the 'Calibration Wizard' button to start the camera calibration process. In the pop-up 'Camera Calibration Wizard' window, select 'Top Camera', then choose 'Completely Recalibrate'. Finally, in the Select Camera Type dialog box, pick 'Fisheye Lens' and click 'OK'.
- Once in the calibration process, first open the door, then hold the calibration board with its pattern facing the camera and the surface flat. Position the board as instructed in the live capture screen, then click 'Take a picture'. After shooting, click 'Next picture' and repeat until all required angles are covered.
Upper left corner | Upper center | Upper right corner |
Center left | Main center | Center right |
Bottom of left corner | Bottom center | Bottom of right corner |
To ensure at least 10 valid photos, you can add extra shots from any angle. If photos from a certain angle are unsatisfactory, take additional ones to supplement.
Finally, click the 'Calibrate' button to complete the distortion calibration.
- Once calibration is complete, select your device type and click 'Upload'. Adjust data and re-upload if needed, then click 'OK'.
- Next, click the 'Frame' button on the machine to check that the border is within the working area and there’s no collision risk. Then press the 'Start' button on the control panel to begin processing.
- Then, click 'Obtain pictures' and follow the instructions on the right to add coordinates for each point.
You can also follow the order of the red numbers in the picture.
In sequence, enlarge the corresponding cross, double-click the left mouse button to add a red cross, and press the left mouse button to change the position of the red cross.
After adding each coordinate, click the '+' button to add the next one until all coordinates are added.
- Finally, export the corrected calibration file for backup.
How to use the camera
Specific steps
- First, ensure that your camera is calibrated or that the calibration file has been imported.
- Next, click 'Camera' to get real-time images, and place the target pattern on the work platform.
- Then, click the 'Refresh' to update the live view.
- After that, click 'Extraction' to capture your desired image; once captured, click 'Extract' to confirm.
- Subsequently, close 'show preview in canvas' and 'visual position'.
- Next, remove the paper that was just placed on the work platform, then re-enable 'show preview in canvas' and 'visual position', and click 'Refresh' to update the canvas content.
- Finally, move the pattern you just extracted to the desired position, then click 'Start' to begin processing.
Still need help?
For specific technical questions or help requests, please open a Ticket with picture or video, so our Support team can assist you ASAP.
For the information provided in the ticket, please refer to this link:
Help Tech Support Troubleshoot Faster
End
Related Articles
Complete Guide to Calibration and Use of TITAN Series Top Camera(New)
Preface Camera calibration ensures precise design alignment for the machine. This guide walks you through the process to boost accuracy and output quality. Please note that the following calibration process is for the new vision algorithm of ...Automatic Camera Calibration Guide
Preface This guide details the complete auto-calibration operation for the Titan series dual/single top cameras, including movable camera calibration and top camera calibration. This function was newly introduced in LM2.3.3. As auto-calibration ...Complete Guide to Calibration and Use of TITAN Series Machine CCD
Preface This guide provides clear instructions on how to import calibration files, calibrate the CCD, and use the CCD for the TITAN series machines. By following these steps, you can ensure the proper functioning and accuracy of the camera system. ...How to Complete the Connection Configuration for the TITAN Top Cover Camera in LightBurn Software(Temporary solution)
Preface This guide will walk you through how to connect the top cover camera of the TITAN series equipment directly to your computer via an extension cable in LightBurn software—serving as a temporary solution to bypass the WiFi board, since ...Titan and Titan Pro Laser Heads (Standard/Optional Configurations and Replacement Overview)
Preface This article describes the standard and optional laser heads (lens tubes) available for the TITAN and TITAN Pro series machines. It also explains how focus settings differ between single-source and dual-source systems, and summarizes the ...