Complete Your First Project with Titan PRO
Preface
This article focuses on how to complete your first project using the TITAN Pro machine. The operating steps are the same for the TITAN.
Connect the Machine to the Software
Make sure the machine is connected to LightBurn or LaserMaker.
The TITAN series machines can be connected in three ways:
Wi-Fi, USB, or Ethernet.
For detailed connection methods, please refer to this link:
Enable the Scanning Offset Setting
Make sure the Scanning Offset Setting value has been enabled and correctly entered in the software.
THUNDER machines are factory-tested for scan offset setting values, which are recorded on an anodized aluminum card and included in the U-disk that comes with the machine.
For TITAN machines, there will be one card.
For TITAN Pro machines, since they are equipped with dual laser sources, there will be two cards, as shown below:
Please refer to the following operation guide to learn how to enable the Scanning Offset Setting function:
LaserMaker
 If no value is displayed under Engraving Correction, please click Read to let the software retrieve the data from the controller.
If the values still do not appear after clicking Read, please manually add the scanning offset value on the anodized aluminum card, then click Upload to send them to the controller.
LightBurn
Open the LightBurn, click the Device Setting→Basic Setting→Enable Scanning Offset Adjustment
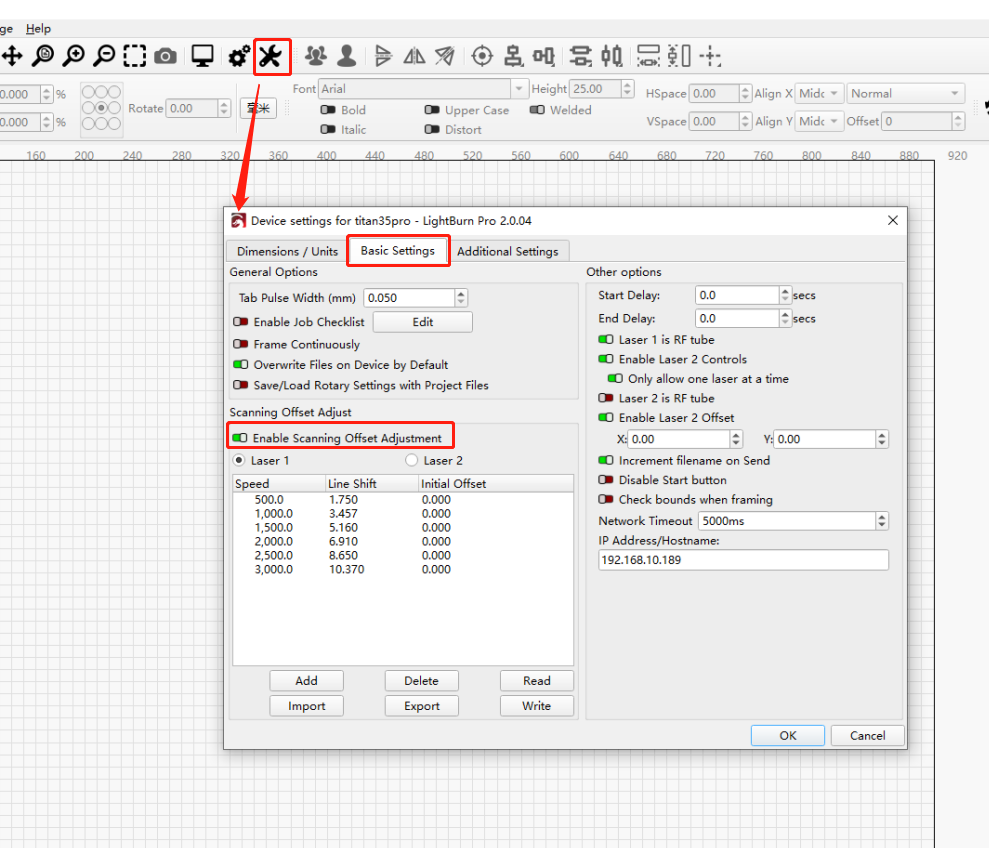
If no value is displayed under Scanning Offset Adjust, please click Read to let the software retrieve the data from the controller.If the values still do not appear after clicking Read, please manually add the scanning offset value on the anodized aluminum card, then click Write to send them to the controller.
Create the design and set the processing parameters
Import your design or use the built-in toolbar to create one. Then, set the processing parameters and send the file to the machine.
For recommended processing parameters, we can refer to the material parameter list tested and verified by THUNDER.
Laser Cutter Settings For Different Materials and Powers
LaserMaker
Importing files from image processing software, the following formats are recognised by LaserMaker:
Source file: LCPX, LCP
Vector files: AI, PLT, DXF, DST, SVG, PDF, XLSX
Bitmap files: BMP, JPG, JPEG, PNG
Create your design using the built-in tools or the image library:
After creating the design, set the parameter.
Suggested: The processing parameters officially provided by LaserMaker, which cannot be modified.
Personalized: A set of parameters saved by the user. You need to manually click Save on the temporary parameters page to save the current temporary settings as your own.
Temporary: Parameters used only for the current job. When any value in the suggested or personalized parameters is modified, it automatically switches to the temporary parameter scheme, which can then be saved as a personalized parameter set.
If your machine is a TITAN Pro that supports dual laser sources, please check Laser 2 to enable the fiber laser output.
The parameters in the Parameters section will also change accordingly.
When Laser 2- Fiber is selected in a layer, the machine will automatically adjust the autofocus height and use the fiber laser for processing during operation.
For more detailed software processing parameter settings and instructions, please refer to the LaserMaker manual:
Manuals for LaserMaker Software
Once the machining parameters have been determined, send the machining file to the machine:
Click the Processing→Send
LightBurn
Importing files from image processing software, the following formats are recognised by LightBurn:
Source file: LBRN
Vector files: AI, PLT, DXF, SVG, PDF, HPGL
Bitmap files: BMP, JPG, JPEG, PNG, GIF, TIF, TIFF
Double-click the corresponding Processing layer option to access the machining parameter modification interface.
If your machine is a TITAN Pro that supports dual laser sources, please check Laser 2 to enable the fiber laser output.
When Laser 2 is selected in a layer, the machine will automatically adjust the autofocus height and use the fiber laser for processing during operation.
For more detailed software processing parameter settings and instructions, please consult the website of LightBurn:
Click the Send to send the processing file to the machine.
Select the Processing File and Parameter Setting
LaserMaker
When receiving the file sent by the LaserMaker, click the File, then press and hold to select the corresponding file.
To fine-tune processing parameters on the panel, click the button in the bottom-right corner to select the corresponding layer and modify the parameters.
Files sent from the Lasermaker allow adjustment of Speed, Maximum Power, and Minimum Power on the control panel.
For processing files for which Laser 2-Fiber is already enabled, the Frequency and Pulse Width can be modified.
LightBurn
When receiving the file sent by LightBurn, click the File, then press and hold to select the corresponding file.
If the processing file has been checked to enable Laser 2, the Pulse Width and Frequency for processing must be set on the Fiber Module.

LightBurn 2.0.4 does not currently support setting the corresponding pulse width and frequency parameters within the software.
THUNDER is actively communicating with LightBurn to implement this feature in future updates.
Press the "+" button to move the cursor down; the "-" button to move it up; "Enter" to proceed to the next menu level; and "Esc" to exit the current menu.
Modification Frequency | Modification Pulse Width |
Start Working
Place the material on the honeycomb table and ensure it is flat.
Move the Laser Head close to the material by the Arrow Button.
Ensure there are no obstructions on the material, then press the AF button to activate autofocus.
Click the Origin to set the start point, then click the Frame to check the size of the design.
Ensure all the covers are securely closed, then press the Start button on the control panel.
Still need help?
For specific technical questions or help requests, please open a Ticket with picture or video, so our Support team can assist you ASAP.
For the information provided in the ticket, please refer to this link:
END.
Related Articles
Complete Guide To TITAN Series Laser Alignment
1 Purpose ⚠️ THIS DOCUMENT IS ONLY APPLICABLE TO TITAN PRO SERIES The purpose of this document is to provide detailed, step-by-step instructions for aligning the optical beam paths of TITAN PRO Series laser systems. This procedure ensures the Fiber ...How to Test Focus Distance on Titan and Titan Pro
Preface This guide explains how to test and confirm the focus distance (focal length) on Titan Series machines. Test results can be saved to the USB drive supplied with the machine. You may perform the test using RDWorks, LaserMaker, or LightBurn ...Complete Guide to Calibration and Use of TITAN Series Top Camera(New)
Preface Camera calibration ensures precise design alignment for the machine. This guide walks you through the process to boost accuracy and output quality. Please note that the following calibration process is for the new vision algorithm of ...TITAN Series User's Manual
TITAN Series User's Manual Please see attached. Still need help? For specific technical questions or help requests, please open a Ticket with picture or video, so our Support team can assist you ASAP. For the information provided in the ticket, ...Titan and Titan Pro Laser Heads (Standard/Optional Configurations and Replacement Overview)
Preface This article describes the standard and optional laser heads (lens tubes) available for the TITAN and TITAN Pro series machines. It also explains how focus settings differ between single-source and dual-source systems, and summarizes the ...