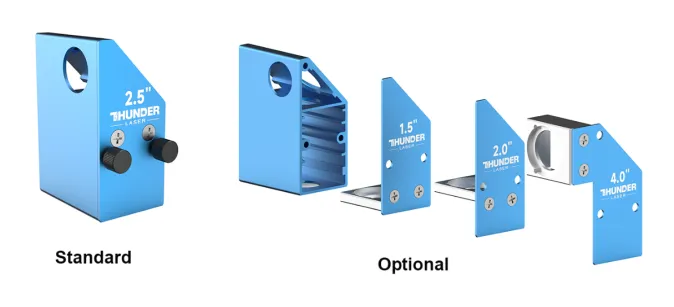
Optional lenses for Thunder Bolt
This article covers the difference between the Four Lens options for the Bolt series machines.
Intro Video:
Appearance of the four lenses:

Engraving Test:
Speed: 1500mm/s
Power: 30%
Picture mode: Halftone
Cells per inch: 90
Comparisons:
1.5 inch lens:
The 1.5″ lens has the smallest burn dot to provide the most detailed engraving effect. But at the same time it has the shortest cutting thickness.
2.0 inch lens:
The thickness of the 2.0″ lens cuts and the engraving effect are well balanced for most cases.
2.5 inch lens:
The 2.5″ lens is ideal for thicker materials that require engraving and cutting.
4.0 inch lens:
4.0″ lens engraving fidelity is not as good as other lenses but it is meant for cutting thicker materials.
Dot Spacing Comparison:
When we have finished engraving all the images, we can then use a magnifying glass to compare the size of the burn dots engraved by each lens.
Lens Selection based on Engraving and Cutting needs:
Fineness of engraving:
1.5″ better than 2.0″ better than 2.5″ better than 4. 0″
Depth of cut:
4.0″ better than 2.5″ better than 2.0″ better than 1.5″
How to replace the lens:
Please refer this link article. Odin/Bolt Laser head assembly diagram
Still need help?
For specific technical questions or help requests, please open a Ticket with picture or video, so our Support team can assist you ASAP.
For the information provided in the ticket, please refer to this link:
Help Tech Support Troubleshoot Faster
End.
Related Articles
Thunder Bolt Series User's Manual
Please see attached: ENDThe Circuit Diagram of the Thunder Bolt
Here's the circuit drawing for the Thunder bolt. Please check attached file. End.Camera Calibration for Thunder Bolt
How to import Camera Correction File Every Thunder Bolt has a camera and also have a calibration file. Directly import the calibration file and the camera can be used. How to calibrate the camera Tools needed:A 3mm plywood of 400X300mm; Some magnets; ...Warranty Certificate--Nova, Nova Plus, Titan, AURORA,Thunder Bolt Series
Warranty Certificate : 2026 Nova Nova Plus Titan Thunder Bolt Aurora Nova Nova Plus Titan Thunder Bolt Aurora 2025 Nova Nova Plus Titan Thunder Bolt Aurora Nova Nova Plus Titan Thunder Bolt Aurora End.Level the honeycomb table on Thunder Bolt
How to adjust the honeycomb table to level Open the front door and remove the drawer. These four screws are used to secure the table holder. Unlock the set screws. During the adjustment process, it is necessary to observe the change in height and to ...