Thunder Bolt Troubleshooting guide for having an Alarm Messege on the Screen
Preface:
Below is a list of warning messages that may appear on the screen of your Thunder Bolt Machine.
These messages are important for diagnosing potential issues and ensuring the proper operation of the machine. You can refer to the following to correspond to the troubleshooting you are experiencing.
1. Alarm about exceed the work area
(Similar to Alarm message of LCD panel—Frame/X/Y Slop over)
① Check that the origin of the file, make sure start from current position.
② Check is that the file size is larger than the work area.
2. Alarm about low air assist
(Similar to Air-assist error on Odin Series)
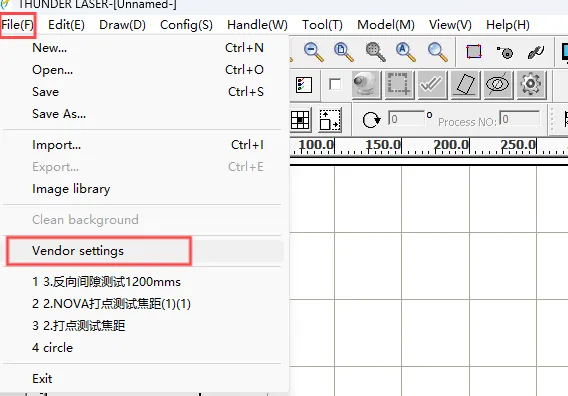
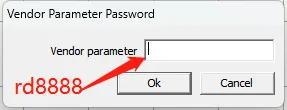
① Check that the software's vendor parameters have the Air Assist Enable turned on.
In Rdworks:


Note that the unzip password is 123456.
In lightburn:
How to adjust the air volume, please refer this link article.
How to adjust the air pressure value of the air pressure detector
3. Alarm about too close to the boundary
(Similar to Alarm message of LCD panel-No enough extend space)
4. Warnings during the running process
① Check if the machine has caught fire causing the temperature to be too high and the machine needs to be restarted.
② Remove IN6 from the TL-Timer, restart the machine and then check if the alarm is still present.
Note: If the alarm persists after unplugging, the TL-Timer is faulty.
4. Alarm about the laser /laser source/temperature/voltage
① Please check the lights on fan control boards D5, D2 and D1.All of them will be on at the beginning of the boot-up process, and will be off at the end of the boot-up process.
Check D5, D1,D2 lights on the fan control board
② Please turn off the machine and then re-plug these wires as well as checking that they are tightly connected.
If the pre-ionization alarm pop-up still appears on the panel. You can refer to the following for troubleshooting.
③If the machine has just been switched on or if the Estop has just been ejected, then D1 on the fan control board is illuminated and the RF tube has to wait 42 seconds to illuminate properly. This is because the pre-ionisation time has not yet expired, so the RF tube will not light up.
④If the D1 light of the fan control board is off, it may be caused by the poor contact between the p11 wire of the fan control board and the TL-Timer board, please plug and unplug these two wires again or try a new one.
⑤If D2 light of the fan control board is on, turn on the max power, wait for D2 light of the fan control board to go off, and then reboot the machine.
⑥ If D5 light of the fan control board is on, use a multimeter to measure the output voltage of the 48V power supply.
⑦ If D1, D2 and D5 lights are on, check the Ethernet cable of the RF tube, or replace it with a new cable.
5. Alarm about door is opened/door isn't closed/machine protected
(Similar to Alarm message of LCD panel--Machine protected(New type sensor))
① Please close all the door before starting work.
② If the door cover is fully closed, check which indicator light on the door sensor checking board is not illuminated.
③ If the door cover has been closed all the way and all the indicators of the door sensor checking board are on, please check whether the wiring connecting the door sensor checking board to the TL-Timer is connected properly.
For the circuit diagram of the Thunder Bolt you can refer to this article.
The Circuit Diagram of the Thunder Bolt
6. Alarm about cooling system
Please check whether the water protection function of the software has been turned on, make sure it's off.
7. Alarm about X/Y/Z limit switch
(Similar to How to check and Adjust the X and Y Axis Endstops on a Thunder Laser Bolt Series Machine)
① If the laser head is hit the limit switch, reset it.
② Open diagnostics, if the alarm is triggered, check that the software X/Y/Z limits are correctly parameterized.
③ Open diagnostics, if the alarm is triggered, please measure whether X-/Y-/Z-/Z+ of the controller is shorted with GND;
8. Alarm about the Autofocus function
① Open the laser head to see if the autofocus sensor triggers properly.
Check that the autofocus is triggered correctly
② Open diagnostics. If an alarm is triggered, check that the parameters of the software U limit are correct.
③ Open Diagnostics, if the alarm is triggered, please check whether the wire from the Auto Focus sensor to the control board are properly connected.
This is the wiring diagram for autofocus to the control board.
Still need help?
For specific technical questions or help requests, please open a Ticket with picture or video, so our Support team can assist you ASAP.
For the information provided in the ticket, please refer to this link:
Related Articles
Thunder Bolt Series User's Manual
Please see attached: ENDHow to use the Alignment (Pulse) Screen on the Thunder Bolt
Preface: Mainly used to check the beam path of the Thunder Bolt. Quickstart Video: Complete Guide: 1.Stick masking paper or double-sided tape in front of the third mirror to concave a circle. 2.The Alignment screen can be accessed from the MENU ...Camera Calibration for Thunder Bolt
How to import Camera Correction File Every Thunder Bolt has a camera and also have a calibration file. Directly import the calibration file and the camera can be used. How to calibrate the camera Tools needed:A 3mm plywood of 400X300mm; Some magnets; ...Power Alarm on AURORA 8 PRO(50QB)
The issue usually occurs on AURORA 8 PRO(50QB).If you have the same problem with other AURORA models, please contact us:tech@thunderlaser.com Problem describe Ezcad 3 show error" Power alarm" Reasons: 1. Unstable voltage with laser source Solution: ...How to Replace Controller for Thunder Bolt
Preface: Switch off the machine and unplug it from the wall before starting replacement. Detailed steps: 1. How to save the parameters of the old controller If you can't communicate the old controller, you need a controller, please skip to STEP 2. a. ...